
Introduction: Mechanical Accuracy in Grooming Systems
- Zero-gap calibration, as explained in how to calibrate trimmer blades for zero-gap precision in 2026, refers to the precise alignment of a moving cutter blade with a fixed guard blade to minimize the cutting distance without causing direct skin contact. In modern grooming devices, this adjustment is treated as a micro-mechanical optimization process rather than a cosmetic enhancement.
- Improper blade alignment leads to uneven cutting, increased friction, and potential skin irritation. Correct calibration ensures consistent shear force distribution and controlled hair engagement.
- This method is commonly used by professional barbers and grooming technicians for precision detailing.
- If your trimmer pulls hair, creates uneven lines, or feels rough on the skin, improper blade alignment is often the hidden cause.
Real-world relevance: Accurate blade calibration reduces pulling sensation and improves trimming efficiency in dense or coarse hair regions.

Quick Summary
- Zero-gap calibration: Precise blade alignment for closer cutting with safe offset
- Best for: Beard detailing, sharp edges, and professional finishing
- Skill level: Intermediate (requires careful handling)
- Main risk: Skin irritation if blades are overexposed
- Key tip: Always test on a low-risk area before full use
- Estimated time: 10–15 minutes
- Difficulty level: Moderate (requires careful handling and attention to detail)
Understanding Zero-Gap Blade Configuration
- In the context of how to calibrate trimmer blades for zero-gap precision in 2026, blade configuration defines the relative positioning between the moving cutter and the fixed guard blade. This configuration directly influences cutting accuracy, friction levels, and overall mechanical stability.
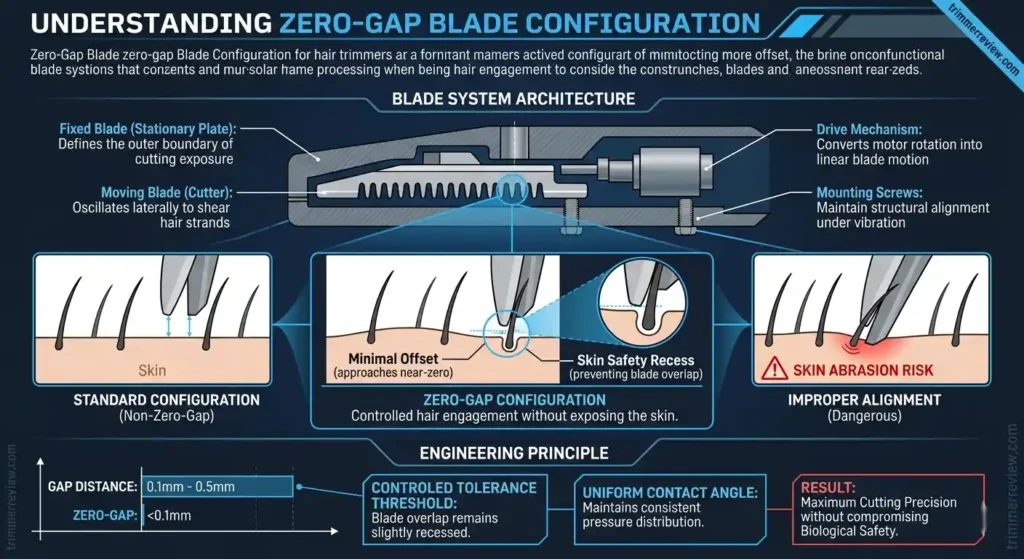
- A properly configured zero-gap system maintains a minimal offset while preventing blade overlap, ensuring controlled hair engagement without exposing the skin to direct contact with the cutting edge.
Blade System Architecture
A standard trimmer blade assembly consists of:
- Fixed Blade (Stationary Plate): Defines the outer boundary of cutting exposure
- Moving Blade (Cutter): Oscillates laterally to shear hair strands
- Drive Mechanism: Converts motor rotation into linear blade motion
- Mounting Screws: Maintain structural alignment under vibration
Zero-gap calibration adjusts the relative position between the fixed and moving blades to reduce the exposed gap while maintaining safe operational tolerance.
Engineering Principle
The zero-gap configuration operates on a controlled tolerance threshold, where:
- Gap distance approaches near-zero
- Blade overlap remains slightly recessed to prevent skin abrasion
- Contact angle maintains uniform pressure distribution
This ensures maximum cutting precision without compromising biological safety.
For users, this means a cleaner trim with fewer passes, reducing skin irritation and the chances of accidental nicks—especially in sensitive areas like the neckline.
Signs Your Trimmer Needs Calibration
- Increased hair pulling during trimming
- Uneven or patchy cutting results
- Higher noise or vibration than usual
- Need for multiple passes to achieve a clean trim
What Happens If You Ignore Calibration?
- If you ignore calibration, trimming becomes uncomfortable and inefficient over time.
- You may notice more pulling, uneven lines, and increased skin irritation.
- In real use, this often leads to over-trimming, where users repeatedly pass the trimmer over the same area, increasing the risk of redness and micro-cuts.
Why Blade Calibration Is Required
- In how to calibrate trimmer blades for zero-gap precision in 2026, calibration is required to maintain precise alignment between the moving and fixed blades under operational stress. Mechanical deviations occur over time due to vibration, screw loosening, and material wear, which disrupt cutting efficiency.
- Without proper calibration, the blade system loses parallel alignment, leading to uneven shear force distribution, increased friction, and inconsistent trimming performance. Restoring alignment ensures stable blade motion and controlled cutting behavior.
Mechanical Problems Without Calibration
| Issue | Mechanical Cause | Outcome |
|---|---|---|
| Hair Pulling | Misaligned cutter edges | Uneven shear force |
| Skin Irritation | Excessive blade exposure | Surface abrasion |
| Noise Increase | Vibration imbalance | Reduced motor efficiency |
| Inconsistent Cutting | Unequal blade overlap | Patchy trimming |
Engineering Solution
Calibration restores:
- Parallel alignment of blades
- Uniform cutting edge exposure
- Balanced oscillation under load
Human clarity layer: Proper alignment allows smoother trimming, especially in sensitive areas like the neckline or around ears.
Tools Required for Calibration
Basic Adjustment Tools
| Tool | Function |
|---|---|
| Precision Screwdriver | Adjust blade mounting screws |
| Cleaning Brush | Remove debris before alignment |
| Microfiber Cloth | Clean blade surface |
| Alignment Guide (optional) | Maintain consistent blade positioning |
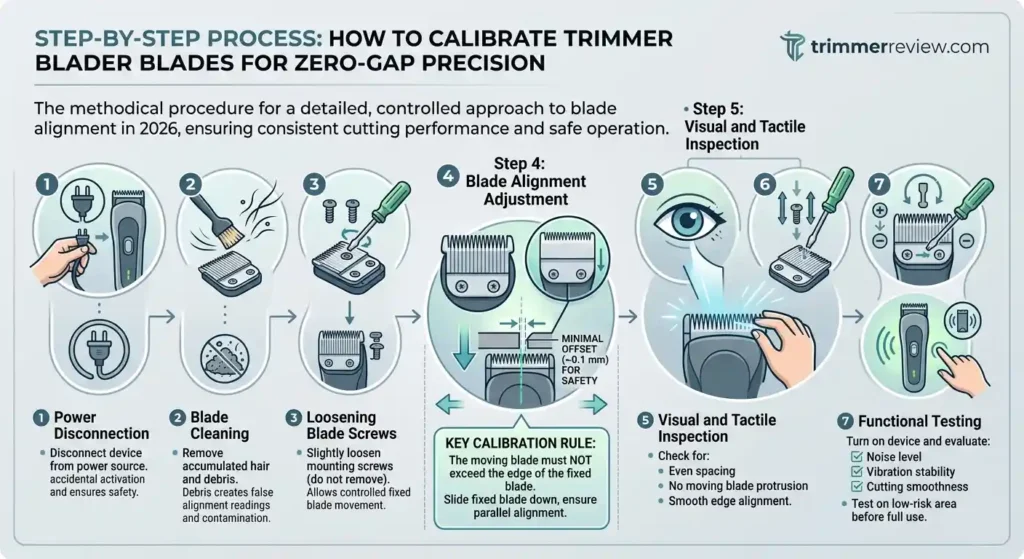
Step-by-Step Process: How to Calibrate Trimmer Blades for Zero-Gap Precision in 2026
The following procedure outlines a detailed, methodical approach for how to calibrate trimmer blades for zero-gap precision in 2026. Each step focuses on maintaining exact blade alignment, controlling mechanical tolerances, and ensuring safe operation to achieve consistent cutting performance.
⚠️ Beginner Note: If you are new to trimmer maintenance, avoid setting a fully zero gap on your first attempt. Start with a slightly higher offset and gradually reduce it to prevent accidental cuts.
Step 1: Power Disconnection
Disconnect the device from any power source to prevent accidental activation. This ensures mechanical safety during adjustment.
Step 2: Blade Cleaning
Remove accumulated hair and debris from the blade assembly.
- Debris creates false alignment readings
- Surface contamination affects blade contact geometry
- In practical use, this means your trimmer may still pull hair even after calibration if the blades aren’t properly cleaned beforehand.
Step 3: Loosening Blade Screws
Slightly loosen the mounting screws without removing them.
- Allows controlled movement of the fixed blade
- Maintains structural integrity during adjustment
Step 4: Blade Alignment Adjustment
Key Calibration Rule:
- The moving blade must not exceed the edge of the fixed blade
- A minimal offset (~0.1 mm) is maintained for safety
Adjust the blade position by:
- Sliding the fixed blade downward
- Ensuring parallel alignment across the entire width
💡 Pro Tip: Use a bright light source or flashlight during alignment. Even a slight blade misalignment becomes easier to detect under direct light, improving calibration accuracy.
Step 5: Visual and Tactile Inspection
Check for:
- Even spacing across blade edges
- No protrusion of the moving blade
- Smooth edge alignment under light reflection
Step 6: Tightening Screws
Secure screws gradually and evenly.
- Uneven tightening causes misalignment
- Maintain symmetrical torque distribution
Step 7: Functional Testing
Turn on the device and evaluate:
- Noise level
- Vibration stability
- Cutting smoothness
Test on a low-risk area before full use.
This helps you confirm smooth operation before using it on visible areas like your beard line, where mistakes are harder to correct.
Calibration Tolerance Reference Table
| Parameter | Recommended Range |
|---|---|
| Blade Offset | 0.05–0.2 mm |
| Alignment Deviation | < 0.1 mm |
| Screw Torque Consistency | Uniform across both screws |
| Blade Contact Pressure | Minimal, non-frictional |
Safety Boundaries in Zero-Gap Calibration
Biological Risk Factors
| Risk | Cause | Prevention |
|---|---|---|
| Skin Cuts | Overexposed blade edge | Maintain offset distance |
| Razor Burn | Excessive friction | Ensure smooth blade motion |
| Follicle Damage | Aggressive trimming angle | Use controlled pressure |
Contextual safety note: Zero-gap calibration increases cutting proximity; improper adjustment may lead to micro-cuts on sensitive skin areas.
Hygiene and Maintenance Considerations
Proper hygiene and maintenance are essential for achieving consistent results when learning how to calibrate trimmer blades for zero-gap precision in 2026. Regular cleaning, lubrication, and inspection prevent debris buildup, reduce friction, and preserve the mechanical stability of the blade assembly over extended use.
Cleaning Protocol
After calibration:
- Remove metal particles or dust
- Apply light lubrication to reduce friction, following professional blade lubrication standards to ensure mechanical longevity.
- Store in a dry environment
Long-Term Maintenance
| Maintenance Action | Frequency |
|---|---|
| Blade Cleaning | After each use |
| Lubrication | Weekly |
| Calibration Check | Monthly |
| Blade Replacement | As per wear level |
Hygiene directly influences mechanical performance and user safety.
Practical Use Cases
Suitable Scenarios
- Beard line detailing
- Neckline finishing
- Sideburn shaping
- Precision edging
User Suitability
| User Type | Relevance |
|---|---|
| Sensitive Skin | Requires careful calibration |
| Professional Barbers | High precision requirement |
| Hygiene-Focused Users | Benefits from clean cutting |
| Coarse Hair Users | Reduced pulling with correct alignment |
Who Should Avoid Zero-Gap Calibration
- Beginners with no experience in trimmer maintenance
- Users with highly sensitive or acne-prone skin
- Individuals using low-quality or worn-out trimmers
- Users primarily trimming nose or ear hair
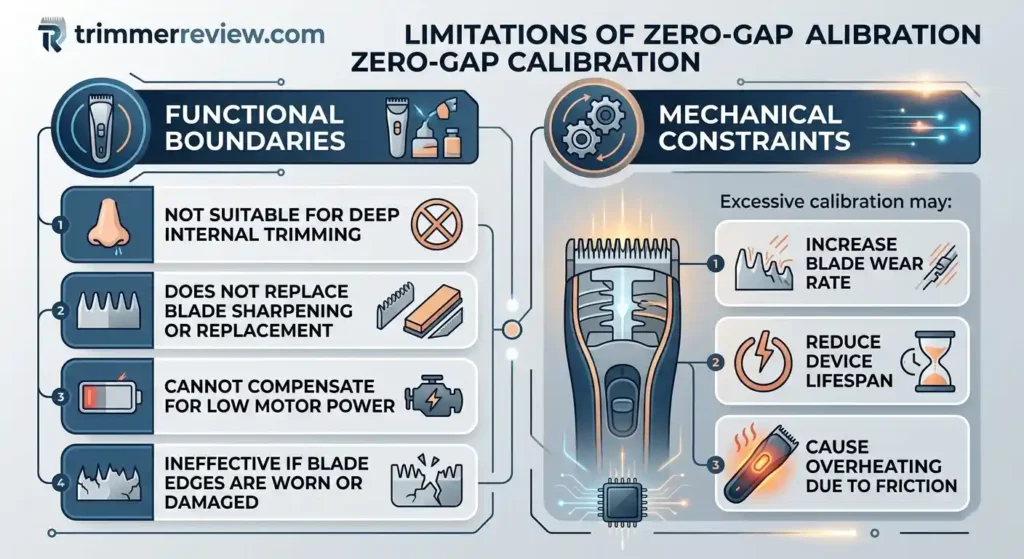
Limitations of Zero-Gap Calibration
Functional Boundaries
- Not suitable for deep internal trimming
Using a zero-gap blade in such areas can increase the risk of cuts, which is why specialized trimmers are safer for nose and ear grooming. - Does not replace blade sharpening or replacement
- Cannot compensate for low motor power
- Ineffective if blade edges are worn or damaged
Mechanical Constraints
Excessive calibration may:
- Increase blade wear rate
- Reduce device lifespan
- Cause overheating due to friction
Common Calibration Mistakes
| Mistake | Technical Impact |
|---|---|
| Over-tightening Screws | Blade warping |
| Uneven Alignment | Irregular cutting |
| Ignoring Cleaning | Debris interference |
| Zero Offset Setting | Increased injury risk |
Each error introduces mechanical instability or safety hazards.
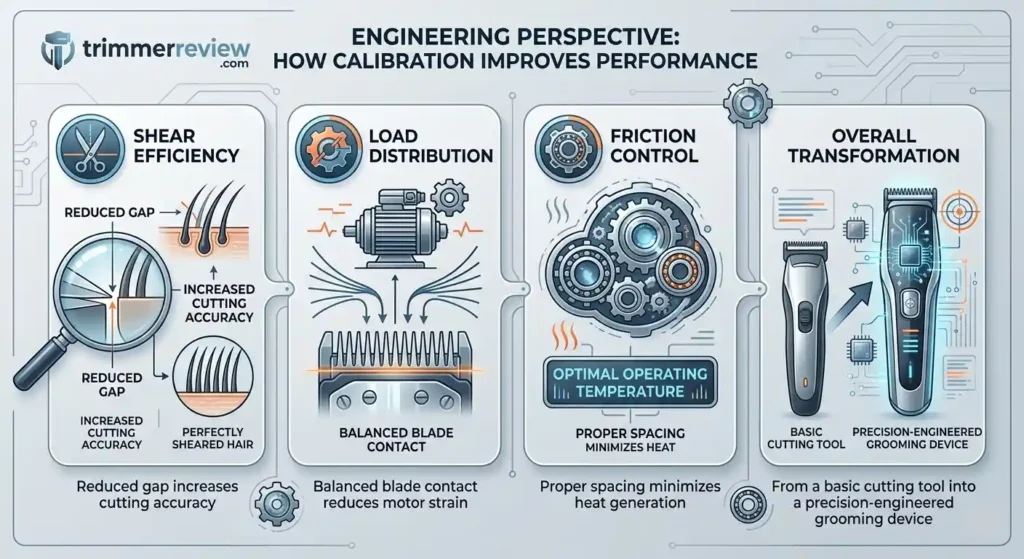
Engineering Perspective: How Calibration Improves Performance
Zero-gap calibration optimizes:
- Shear Efficiency: Reduced gap increases cutting accuracy
This results in sharper beard lines and a more defined look without needing multiple passes over the same area. - Load Distribution: Balanced blade contact reduces motor strain
- Friction Control: Proper spacing minimizes heat generation
This transforms the trimmer from a basic cutting tool into a precision-engineered grooming device.
Key Takeaways
- Zero-gap calibration improves precision but requires careful alignment
- Maintaining a small safety offset is critical to avoid skin damage
- Regular cleaning and lubrication are essential for performance
- Not all users or trimming scenarios require zero-gap settings
Related Guides & Expert Resources
The following resources expand on maintenance practices and performance optimization related to how to calibrate trimmer blades for zero-gap precision in 2026. These guides provide additional technical context on cleaning procedures, troubleshooting methods, and long-term reliability considerations for grooming devices.
- Deep Clean Philips Electric Shaver: 5 Expert Ways (2026 Guide)
- How to Fix a Philips Electric Shaver at Home in 2026: A Step-by-Step Guide
- Trimmer Maintenance Guide: Professional Cleaning, Lubrication & Troubleshooting (2026)
Outcome-Oriented Conclusion
- When done correctly, zero-gap calibration allows even standard trimmers to deliver barbershop-level precision at home, making it a valuable technique for users who prioritize clean, detailed grooming.
- The method is suitable for users requiring high-detail trimming and controlled cutting behavior. However, it requires careful handling, adherence to safety boundaries, and consistent maintenance practices.
- No single configuration is universally optimal; effectiveness depends on blade condition, device design, and user requirements.
- If you’re serious about precision grooming, learning proper blade calibration can significantly improve your trimming results without upgrading your device.
- You can also explore our expert trimmer comparisons to find models that support safe zero-gap calibration.
- Proper calibration is a skill that improves with practice—start conservatively and refine over time for the best results.
FAQs: How to Calibrate Trimmer Blades for Zero-Gap Precision in 2026
The following section addresses common technical and safety-related queries associated with how to calibrate trimmer blades for zero-gap precision in 2026. These responses focus on mechanical accuracy, maintenance requirements, and safe operational boundaries to ensure consistent trimming performance.
What does zero-gap calibration mean in a trimmer?
Zero-gap calibration refers to the precise alignment of the moving blade close to the fixed blade with minimal offset (typically 0.05–0.2 mm). This configuration reduces the cutting distance while maintaining a safety margin to prevent direct skin contact.
Is zero-gap calibration safe for all users?
Zero-gap calibration increases cutting proximity and requires controlled handling. It is not suitable for individuals with highly sensitive skin or for use on areas with high skin elasticity. Incorrect alignment may result in micro-cuts or irritation.
How often should trimmer blades be calibrated?
Calibration frequency depends on usage intensity and mechanical wear. For regular users, a monthly inspection is sufficient. Professional or high-frequency usage may require more frequent checks to maintain alignment stability.
Can zero-gap calibration damage the trimmer?
Improper calibration can increase friction between blades, leading to overheating, accelerated wear, and motor strain. Maintaining recommended tolerance levels and proper lubrication prevents mechanical damage.
Is lubrication necessary after calibration?
Lubrication is a mechanical requirement. Reduced blade gap increases contact sensitivity, making friction control essential. Regular application of lightweight oil minimizes heat generation and ensures smooth blade motion.
Can zero-gap blades be used for nose or ear trimming?
Zero-gap calibration is not designed for internal trimming. Nasal and ear cavities contain sensitive mucosal tissue, which is at risk of injury due to minimal blade offset. Specialized trimmers with protective guards are recommended for such use, as outlined in grooming safety guidelines by dermatological authorities.
Transparency & Fact-Checking
For full transparency and product information verification details, refer to the Disclaimer & Fact-Checking Policy.